Giant Halfway Folding Bike Review

I’ve been doing my cycling on a old steel frame road bike – putting it in the boot of the car, driving the kids to school, cycling home, then cycling back in the afternoon and driving the kids home. This saved money on the car and meant I got exercise built into the day. It was also lots of fun.

However, now we’ve got a Tesla Model 3 and the road bike doesn’t fit into the boot any more. We’ve got some big hills round here so I needed a folding bike that would cope – both up the hills and down. I bought the first decent local folder that appeared on eBay, and it turned out to be a Giant Halfway.

Giant Halfway

I then found out that the Halfway was designed by Mike Burrows, a hero of mine. So I’ve got an actual Mike Burrows bike which is very cool 🙂

Continue reading

Thorn Me’n’U2 Tandem Dynamo Bracket

With the days getting shorter and darker I needed to get the dynamo working again. I had mounted this on a simple bracket bolted to the front panier rack mounts. However the stronger forks for the electric motor don’t have these mounts, so something else was needed.

As an aside I am still a fan of dynamo lights. In the old days (pre Li-ion batteries and LED lights) a dynamo system was the only way to get a usable bike light. These days battery systems are brighter than dynamo lights. However there is a huge advantage in a lighting system that never requires charging, is always on the bike and thus is always available for use even if you didn’t think you would need it.

However, it must be said that on this bike a battery front light is a requirement at night as getting started on a three-seat tandem in pitch black is hard. Without a light you’ve got no real idea which way is up.

Dynamo bracket
Continue reading

Thorn Me’n’U2 Electric Conversion – Conclusions

The motor is now fixed, the speed sensor wire is lengthened and the sensor fitted, and the rear brake sensor is now fitted. We’ve just done an 18 mile ride with lots of hills. How well does it work?

Background

I’m around 85kg, the kids are around 50kg between them, and the bike is around 35kg with the electric motor fitted. Plus luggage. Say 180kg total – quite a lot to haul up a hill.

Most of that weight is on the front wheel.

No more worries about hills

The biggest change is that hills are no longer a problem. I used to be aware of all the hills I would have to climb – not worried but I would always have them in the back of my mind and would choose a route to minimise hills. Now I don’t think about them.

I’ve normally got the power set on 3/5. This is enough to easily climb hills (almost any hill) at about 8mph with low battery consumption. If I increase the power to 5/5 (max) then the speed will increase to about 12-13mph but the battery drops fast.

I no longer use the small chainring at the front – it isn’t necessary. Bottom gear in the middle ring is low enough for any hill I’ve found so far.

Continue reading

Bafang BPM front hub motor cable replacement part 2

As mentioned previously I used the existing cable – just shortening it a bit. The remaining length is ok and I didn’t need to get a cable through the axle from scratch.

I carefully drew a diagram of the colours of the wires and reconnected the new ends to the correct colour. The soldered joints were covered in heat shrink and self-almalgamating tape.

I didn’t use any glue, putty or sealant. I reused the existing wire ties and added another around the omega clip.

Recut wire soldered in

Note that the wire exits the axle inside the motor on the same side as the aperture on the end of the axle. This means that if the aperture on the end faces downwards, and any water gets into the axle, it will drain into the motor. Whereas if the aperture on the end faces upwards then water cannot get out of the axle into the motor.

Continue reading

Bafang BPM front hub motor cable replacement

As mentioned in a previous post I damaged the cable for a Bafang BPM front hub motor. I found various instructions on the web for strip-down instructions – notably this strip-down on Endless Sphere.

My motor isn’t exactly the same as any of the stripdowns I’ve seen – mine is a front hub 250W motor without sensors. I’ve put some details here if only for me when I need to do this job again!

The cover plate comes off easily enough and the motor unit can then be pulled out of the hub. Note any washers between the outer hub and the motor unit!

Two shim washers on the non-wire side of the hub

The clutch and planetary gears can be pulled off. The sun gear can then be unscrewed from the motor and the circlip underneath it removed.

Continue reading

Thorn Me’n’U2 Electric Conversion Part 3

Good and bad news.

Good news

The conversion is finished and the motor works well.

LCD fitted and connected
Lots of wires everywhere. One day they might be tidier.

We did a 20 mile ride including 1100 feet of ascent and descent. It would have been a killer without the motor, but with the motor it was fun. It isn’t sophisticated but it is certainly effective – it can pull all of us up a steep hill without any pedal pressure but the battery doesn’t last long under that treatment.

I’m happy with the front-wheel drive and positioning of the components. The bike is very stable – and in slippery / muddy conditions the bike feels more stable with the front wheel driving as well as the rear.

Continue reading

Thorn Me’n’U2 Electric Conversion Part 2

Some progress on the conversion.

Pedal Sensor

I’ve made a new pedal sensor rotor and sensor mount. I wanted a bigger rotor so that the sensor could be positioned outside of the radius of the tandem eccentric bottom bracket. Not knowing exactly how the sensor worked I kept the same distance between magnets, so the rotor now has 16 magnets instead of 12. The rotor is made from Tufnol as I had some, it is non-magnetic and glues well.

Test fitting the new rotor on the front crankset

The rotor bolts onto the drillings for the inner chainring. Most bikes will either have an inner chainring fitted or (for a tandem) a simple crank arm. The triplet tandem is probably unique here. I’m not sure if it makes any difference but I did make sure that the magnets are the same way round as the original rotor.

Continue reading

Thorn Me’n’U2 Electric Conversion

The bike is fantastic, however pulling a total of about 180kg up long hills leaves me worn out. It is ok until I hit bottom gear but at that point there is nowhere else to go other than leg power. We’ve always got up the hills – and I am definitely fitter and stronger than I was – but with my partner having an electric bike she has been suggesting routes that I don’t want to do due to the number of hills. I’d like to be able to ride further without worrying about the hills. I’m also curious about the kits and how they would work in practice.

So I did my research and bought a BPM kit from Woosh. Woosh have a great reputation and Andy’s patient answering of my innumerable queries has been outstanding. The BPM motor has a good reputation for lugging heavy bikes up steep hills where other motors simply melt – very important given that I’m expecting this motor to cope with pulling anything up to 250kg up 17% (1:6) hills. It is a front wheel motor; as mentioned before the rear wheel of the bike doesn’t have much weight on it and I get wheelspin on slippery surfaces with pedal power.

The kit arrived promptly and quality was good.

Continue reading

Boardman HYB 8.9e electric bike review

My partner needed an electric bike – it is hilly round here so an ebike was the only viable option. There were two important criteria:

  1. She isn’t particularly small, but the trend towards large wheel sizes means that most bikes are far too big.
  2. Her top priority was that it shouldn’t look like an electric bike – no bulky battery.

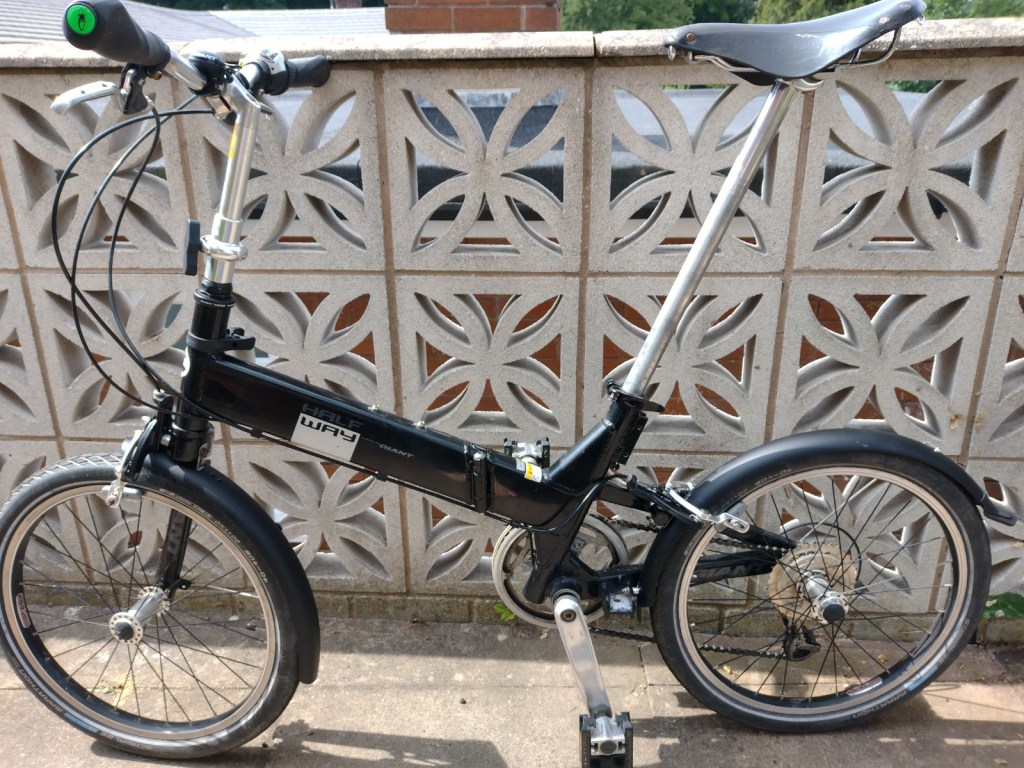
One of the few bikes that met both criteria was the Boardman HYB 8.9e with the Fazua battery and motor system. Both the battery and motor are in a removable lump that clips into the bottom of the downtube. The motor drives the bottom bracket via a three-lobed rotor (that forms the Fazua logo). It is a mid-drive unit – the motor power is transmitted via the normal gears and chain – with torque sensing.

Overall the bike seems to be good quality. The first bike seemed to have been dropped during assembly – the plastic top downtube liner was broken – but Halfords shipped out a replacement quickly and that bike has been fine. It rides nicely and the Fazua system works very well, providing plenty of power for even steep hills.

I did upgrade the firmware in the motor to version 2.0 and tweak the settings via the Fazua toolbox. This was easy to do and very worthwhile – the bike is much more powerful and responsive now. It is still entirely legal – the changes are better performance at a wider range of cadences, plus less rider pedal pressure for given level of assistance.

I’ve fitted mudguards and a rear panier rack. I like the way that the front mudguard eyelets are part-way up the forks. This is an important safety feature as it stops the front mudguard getting jammed in the front wheel if road debris gets between the tyre and mudguard. With the eyelets close to the wheel the mudguard gets closer to the wheel as the debris moves up, causing a jam. With the eyelets further up the mudguard moves away from the wheel releasing the debris and avoiding a jam. The panier rack is so she can lug the heavy stuff up the hills!

The bike is nice and light – about 14kg including battery and motor. It doesn’t feel heavy and is easy to lift around.

The only downside is the downtube. This isn’t actually a tube as it is part of the Fazua system – it is just a C shape so the battery and motor can be clipped in. This means it has very little torsional ridgidity – readily apparent if you watch closely while pressing on a pedal. In practice this doesn’t matter at all – the motor power means you never press hard on the pedals anyway!

Overall – recommended. My partner loves the bike and is happy to go on rides with big hills.

Rebuilding steel-framed bike

One option to get fitter, reduce car costs and reduce carbon emissions is to:

  1. Drive myself and the kids to school in the car;
  2. Get bike out of the car boot and cycle home;
  3. Cycle back in at pick up time, dismantle bike and put it back in the boot of the car;
  4. Get kids and drive back in the car.

I discovered that a bike my dad bought me for school will fit in the boot of the car with its wheels off. It is a nice bike – great fun to ride. However the freewheel was free in both directions and the paint was coming off, leading to rust.

First stage was to strip off the old paint. I was going to get the frame shot-blasted and powder coated. However I couldn’t find anyone locally to do this – most calls went unreturned – and I didn’t want to put the frame in the post due to the risk of damage. For this bike I don’t really care what it looks like – the paint needs to stop rust and if it looks rough it is less likely to get stolen.

Continue reading